Thursday, May 3, 2012

Schamelot Water Kefir

I've been brewing water kefir off and on for a little over a year thanks to my good friend, Jess, and Ruth at Just Another Day In Paradise recently hooked me up with some fresh grains after I'd taken a break.  These were grains she'd been tending for several months which I originally gave to her!  Brewing kefir is a great way to keep up a friendship!

So this is how I do it...


I first add one cup of white sugar to a gallon pickle jar.


Then I fill the jar almost all the way with cold filtered water.


Next I add 1/4 cup water kefir grains to the jar.


Water kefir gets its wonderfully refreshing flavor from lemon and ginger. I usually halve a whole organic lemon and peel a chunk of ginger, which I keep already cut up in the freezer. The ginger peels easily from the freezer under warm water. I usually use the lemon and ginger for two batches of kefir. So on the first batch I only halve the lemon and throw in the ginger whole. On the second batch I cut the lemon halves in half again, and cut the ginger in half as well. It's o.k. to add a new lemon and ginger chunk each time, but I just try to save a few cents where I can. You may also need to add half a cleaned egg shell, or a pinch of sea salt, or quarter teaspoon of baking soda to stimulate the growth of your grains. Some people also add unsulphured sultanas, or golden raisins. I've heard of some people adding unsulphured dates. I suggest you do a little internet research on growing healthy kefir grains to find out more.


I add the lemon and ginger to the water and mix it up to dissolve the sugar.


After the kefir brews for about 48 hours (you can tell it's getting done because the water turns cloudy like Fresca Soda and there are bubbles rising and you can even take a little taste to test the sweetness--finished kefir isn't really that sweet because the sugar gets metabolized by the kefir grains) you just strain it all into a storage container.


I use a PUR refrigerator water filter with a tap that I got at Goodwill for $2.99. The kids gulp this down! It's close enough to soda as far as bubbles go to make an acceptable substitute, and it's so refreshing when it's cold! You can flavor it further with fruit juices if you like--just let the juices ferment on the counter another 24 hours before drinking, but my kids like it just fine straight up and don't usually want to wait another day to try something new.
(See all the other jars of yummy homemade dressings and ferments in my unusually tidy refrigerator!  That little jar  underneath with the red and yellow lid contains a happy little family of kefir grains that need to be adopted!  Let me know if you're interested.) 

 From a Living Kitchen!


24 Hour Greek Style Yogurt made with Half-and-Half

I started making 24 hour yogurt about a year ago when I read about how the long fermentation process "denatures" or predigests the offensive components to milk, like lactose, and casein. Additionally, the sugar used in making vanilla yogurt is metabolized by the yogurt bacteria making it gentler on my little guys' systems--we seem to have less problem with impulse control when they're off white sugar, or when the sugar's been metabolized by something else before the kids eat it (as is also the case with kefir and kombucha).

I start by gathering all my 1 quart wide mouth glass canning jars and lids into my pot and setting them on the stove to boil. It's important to have sterile jars, lids and tools while making yogurt so you don't introduce bacteria into the mix that might inhibit the yogurt bacteria from doing its job. 


 Add one and half cups of sugar to your pot.


 I use a gallon and a half of half-and-half, which will make just a little over a gallon and a half of rich, creamy, thick Greek style yogurt. Whatever warm sweet cream I have left over after filling all my jars I give to the little ones for a treat they love!


I pour most of my half-and-half into my pot using a slotted spoon to dissolve the sugar in the crean, and leaving about a cup of cream in the carton for Caeli's morning coffee. I still end up with a little extra warm sweet cream. I guess I could leave closer to two cups of half-and-half and probably not have any cream left over to treat the little ones, but they'd be so sad... 
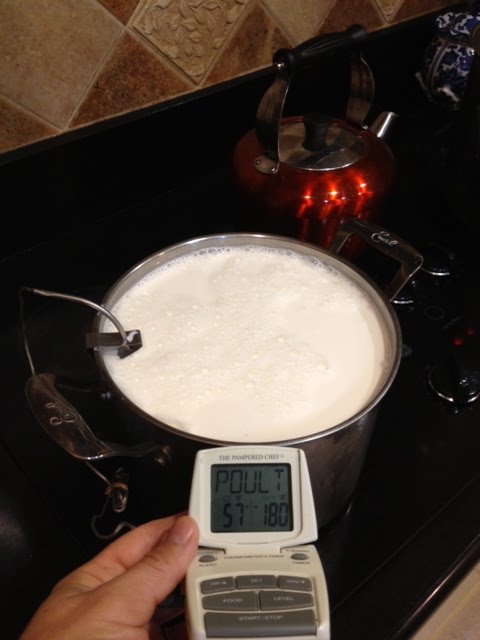
I use a digital thermometer that has an alert function on it.  So I set my alert temperature to 180 degrees (the well-done temperature of poultry) and just wait for the cream to get got.  I set the stove top on 8 out of 10.  I guess it usually takes about 15 minutes starting with cold-out-of-the-fridge cream.


 While my cream is warming up to 180 degrees F, I wash the dishes!


  I put a clean dishpan in my sink with about 4 cups of ice in it. This is to cool my cream in after it reaches 180 degrees.


 Then I put my pot of hot cream into the ice, adding a little cold water to the dishpan of ice until my cream cools to 120 degrees.


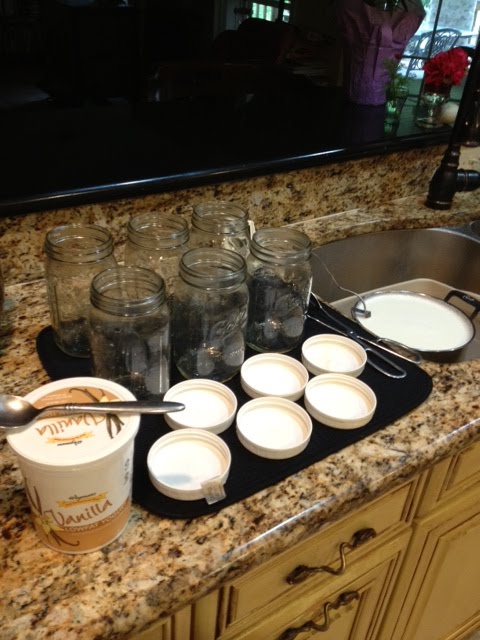
 While my cream is cooling I take my sterilized jars and lids out of the pot and set them on the counter to cool and dry. I save the pot of hot water to continue to sterilize any new tools I use for filling my jars, like my ladle and funnel.


Once my cream cools I add a tablespoon of pure vanilla extract and stir it into the cream with my slotted spoon. 


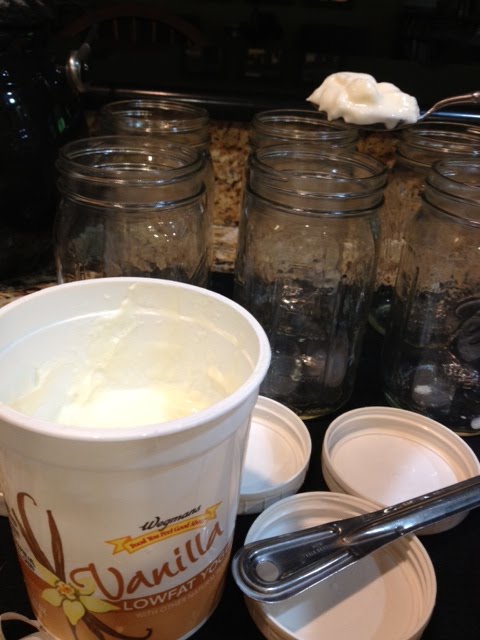
I add a spoonful of yogurt to each jar as a starter culture. I just use store bought yogurt that says it has live, active cultures in the labeling. You can also use some left-over yogurt from your previous batch, but my kids usually lick the jars clean before I can reserve any for the next batch. I should probably make a little jar of yogurt to hide in the back of the fridge just for this purpose. You can use your own yogurt to start a new batch a few times but eventually you'll have to get some store bought yogurt again because the bacteria loose their vigor--or so I've read--never tried using my own yogurt more than once. 


 Here you can see I've dropped a rounded tablespoon of yogurt into each jar. Make sure your jars have cooled or the heat can weaken and even kill your starter.


 Now it's time to temper your yogurt starter with the warm cream. Just pour a ladleful of warm cream into each jar (I use a funnel to avoid so much mess) and gentle swish the cream and yogurt around in the jars. The idea here is to introduce the two to each other, not blend them together, so be gentle--no need to use a utensil to mix.


 After you've tempered your starter you can ladle or pour the remaining cream into each jar. I usually pour the cream almost all the way to the top, which sometimes leaks during the fermentation process, leaving little yogurt rings on the bottom of my dehydrator. Again, if I reserved closer to two cups of cream at the start I could probably avoid this minor inconvenience.


 But as you can see the little ones don't really mind when there's a surplus of warm sweet cream!


 Six beautiful full jars of warm sweet vanilla cream and yogurt starter ready to eat in about 30 hours. Trust me--it's well worth the wait!


 And the same six beautiful full jars snuggled up nice and cozy in our second-hand Excalibur dehydrator (the Rolls Royce of dehydrators!). You don't have to use a dehydrator to make yogurt. Remember that pot of hot water you saved to sterilize all your tools? Well, you can pack your jars into an cooler chest and then add some cold water to the pot of hot water until you reach about 115 degrees and pour it into the cooler with the jars. Put the lid on tight, maybe wrap the cooler in a blanket or towel and set it in a non-drafty location for 24 hours. I've done it this way many times, but since we have this dehydrator now taking up space in my dining room I figure I might as well use it.


 The Excalibur has a temperature dial that specifies what temperature you should set it at for what kind of food your making. Our sets yogurt at 115 degrees, but I've found that I get a creamier (less grainy) consistency when I set it between 105 and 115.


Now all you have to do is wait--and boy is it hard. The kids are so tantalized by the sound of the dehydrator going for the next 24 hours they can hardly stand it. And some of them would eat it warm right away. But I always insist we chill it first to get the best consistency--so thick and creamy it won't fall of of Dan's spoon while he insists on feeding himself. It's like custard, and would probably actually be good warm--or cold on warm apple pie--but just really gosh darn delicious all by itself!

 I hope your family enjoys this yogurt as much as we do!


Thursday, November 24, 2011

Hibiscus Flowers!

Just today discovered the magical excitement of dried hibiscus flowers (available from Wegman's loose tea department). Made a syrup of 2 cups hibiscus, 4 cups water, bring to boil and steep as long as you have time; strain well and combine with 2 cups sugar; return to stove top and heat until all the sugar is dissolved. It tastes sweet and tart and wonderful!

Now you can make:

hibiscus margaritas
hibiscus spritzers (with ginger ale and club soda)
hibiscus sorbet
hibiscus salad dressing
hibiscus jelly
hibiscus hard candy

and I have a feeling the list will go on...

I'll post recipes as I try them!

Happy Thanksgiving!

Wednesday, October 26, 2011

Deep-Fried Mac-n-Cheese Bites

After you try my awesome stove top mac and cheese
, making sure to fix enough for there to be left-overs, you've got to try deep fried mac-n-cheese balls. TO DIE FOR! I dare say even the most elegant finger food you ever thought you could make with left-over anything, let alone mac-n-cheese!

Let the mac and cheese cool until you can shape it into meatball-size off-rounds. Let these chill in the fridge overnight. Next day, take them out and dredge them in flour, dip them in egg, roll them in panko or ordinary bread crumbs and deep-fry at 350* until golden.

You can also spread the left-over mac-n-cheese in a dish, chill and cut into cubes--I just like to make things complicated and I've got a thing for chicken croquets, salmon balls, cream puffs and other spherical food.

Try it! You'll never mind having left-over mac-n-cheese again!

Saturday, October 22, 2011

Perfect Baked Chicken Breasts

I accidentally discovered the perfect way to bake or roast chicken breasts when we lost power a half hour after I'd put about 8 pounds of marinated chicken breasts in the oven.  As soon as the power went out I solemnly declared to all and sundry, "Don't open the oven door!"  An hour later, after John got home from work and we sat down to eat, the chicken breasts were cooked to perfection:  still nice and hot, tender, juicy, just the slightest hint of pink in the center, juices running clear as crystal--in short, perfect!

I've been making them this way once a week ever since, and I've come up with a mix and match list of ingredients to vary the theme each time.  You can mix and match your own marinades and let me know what your family likes best.

I just start pouring stuff in the blender (except for the flavorful texture items) until I get an aroma I like. I'm not afraid to just start mixing (following some mysterious instinct I guess). It always seems to come out pretty good.

Fats:  For a large family size pack of breasts I use anywhere from 1/4 to 1/2 cup fat.

olive oil
sesame oil
butter
tahini (sesame paste)
peanut butter

Acid: Also about 1/4 to 1/2 cup of acid.

citrus juice
vinegar
wine
whiskey
tomato juice
pineapple juice
buttermilk (the enzymes in the buttermilk tenderize the meat like any of the other acids)

Sweetness:

honey
molasses
maple syrup
pomegranate syrup
sugar (brown or white)
jam

Salty:

soy sauce
Worcestershire sauce
magi
mustard
tabasco
anchovy paste

"BAM"

garlic
ginger
onion
shallots
hot peppers
tomato paste
green onion
liquid smoke

Colorful flavor

cilantro
rosemary
crushed red pepper
basil
thyme
parsley
tarragon
specialty seasoning

Spice

pepper (red, black, green or white)
paprika
chipotle
chili powder

Flavorful texture: to be added to the roasting pan after the marinade has been blended and poured over the breasts

capers
olives
sun dried tomatoes
diced tomatoes
artichokes
pineapple (rings, chunks or crushed)
mandarin oranges
feta cheese
blue cheese

Mix the marinade ingredients in the blender and pour over chicken, turning pieces to coat. When you're ready, place breasts and marinade in baking pan with any other ingredients you like, cover, and bake at 350* for 30 minutes. Turn off the oven, leaving the door shut for another hour. Should be perfect!


Some of the combinations we've enjoyed are orange, garlic, ginger, sesame oil, and green onion; balsamic, olive oil, pomegranate syrup, garlic and rosemary; and soy sauce, sesame oil, garlic, ginger and crushed red pepper. This week I'm going to try lemon, butter, and tarragon with capers. Give it a try and let me know what you come up with!


Tuesday, August 16, 2011

The Bomb Homemade Spaghetti Ohs!

Finally sharing this one after a few tweaks...

32 oz Chicken Broth (I use Progresso b/c it doesn't have loads of crap like some of the other store bought chicken broths)
1 c. water
6 oz Tomato Paste
1 T. dried minced onion
1 T. garlic salt
1 T. sugar
1/4 cup butter
1/4 cup Parmesan Cheese
8 oz. (2 cups) Anelleti (spaghetti circles)

Bring the chicken broth to boil.

Drop tomato paste, onion, garlic salt, sugar, butter and parm in the blender pitcher (I know they're outrageously expensive, but I think ever kitchen should have a Vitamix blender. After killing 4 or 5 blenders, some mine, some not, making Pina Coladas and other various and sundry concoctions, John finally bought me a Vitamix BarBoss and it's the greatest! We use it for smoothies, milk shakes, mixed frozen drinks and Spaghetti Ohs just to begin with.)

After the broth comes to a boil add 2 cups to the blender and puree.

Add one cup water to the remaining 2 cups broth and return to a boil.

Add 2 cups Anelleti to boiling broth mixture and cook until pasta is tender and broth is mostly absorbed.

Add tomato sauce mixture to pasta and return to warm burner, mixing to thicken slightly.

Serve immediately with an additional dusting of Parm is you like.

So delicious, and so much better for little growing bodies than the canned garbage.

Saturday, February 26, 2011

Salisbury Steak ala Schamelot

Made this one up myself after I couldn't find a recipe on line that already sounded like what I had in mind. I do that a lot...

4 lbs lean ground beef
1/2 cup finely diced onion
1-2 Tbs soy sauct
1-2 Tbs Worcestershire sauce

Mix this up and let the flavors marinate a bit while you make the gravy in a cast iron skillet:

2 Tbs bacon grease, chicken fat from stock, or some other fat
1 large chopped onion
2 cups sliced mushrooms
1 large finely diced green bell pepper
1/4 cup corn starch
4 cups chicken stock/broth
2 Tbs Maggi seasoning, or soy or Worchestershire or salt and pepper to taste

Saute the veggies in the fat. Mix the corn starch, Maggi or other seasoning and cold chicken stock. Add to skillet after veggies are soft and have finished yielding their juices. Allow to thicken, adding more corn starch in water if too thin and more stock if too thick. Lower temp just to a bubble.

Meanwhile, form ground beef mixture into oval, hand-sized patties and cook on a griddle, pressing down the patties with a spatula so that the edges of the patties "fray." Brown each side of the patties and then slip them into the skillet of gravy. You can keep them moist and warm in the gravy over a low temp for some time until you're ready to eat. Serve over mashed, skin-on red potatoes and be very generous with the gravy!

My family loved this way more than any meatloaf I've ever made, and said it was a great gluten-free alternative to our usual Wednesday night favorite--hamburgers.

Thursday, December 17, 2009

Tzatziki

We've gotten to where we like to eat this with practically every meat dish I prepare. So delicious and good for you!

Ingredients

* 2 cups plain full fat yogurt (high-quality, without gums and thickeners)
* 2 teaspoons pureed very fresh garlic
* 1 teaspoon sea salt
* 2 cucumbers, peeled, seeded and grated on large holes of grater
* 1/2 teaspoon freshly ground black pepper
* 2 teaspoons olive oil
* Dill leaves, for garnish

Directions

Drain yogurt for 1 hour in a cheesecloth-lined strainer to remove some of its water. In a bowl, combine the yogurt, garlic and 1/2 teaspoon salt. Sprinkle the remaining 1/2 teaspoon salt over the grated cucumber and drain, 10 to15 minutes, to extract excess water. Add drained cucumber to yogurt, along with pepper, and mix well. Cover and refrigerate until chilled, about 1 hour. Drizzle with olive oil and garnish with mint leaves. Serve with pita triangles or grilled fish.

St. Lazarus Corpses

For St. Lazarus Feast day this year we decided to make something that would resemble the wrapped-for-burial body of the saint. We found this recipe for the occasion, sheets of buttered or oiled phyllo, enshrouding cooked, well-spiced ground beef, the oil and spices reminding us of ancient Jewish burial customs:

Ingredients

2-1/2 teaspoons olive oil
1-1/4 pounds lean ground beef
1-1/4 cups canned crushed tomatoes,
drained
1/2 teaspoon ground cinnamon

1/2 teaspoon ground cumin
1/4 teaspoon paprika
1/4 teaspoon ground allspice
2-1/2 (16 ounce) packages phyllo dough
melted butter


1. Preheat oven to 350 degrees F (175 degrees C). Lightly grease a baking sheet.

2. Heat olive oil in skillet over medium-high heat. Cook ground beef until it loses its pink color and begins to brown. Drain fat from skillet. Add tomatoes, cinnamon, cumin, paprika and allspice. Reduce heat to medium and simmer until mixture reduces slightly, about 10 minutes.

3. Remove one phyllo sheet from package and keep the rest covered with a clean cloth until ready to use. On a flat work surface, cut the phyllo sheet into 2 14x9-inch rectangles. Brush the first half-sheet with melted butter, place the 2nd half on top of it and brush again with butter. Place a generous teaspoon of the meat mixture near the narrow end of the dough. Fold dough over the top of the meat, fold in the sides of the dough, and roll into a narrow tube (cigar) shape. Repeat until all the meat has been rolled up. Arrange "deceased" on prepared baking sheet.

4. Bake in preheated oven until lightly browned, about 25 minutes.

I'm serving these with tzatziki and Moroccan eggplant salad.

Hope this isn't too morbid for you!

Chocolate Pepper Cookies

I started making these cookies every Christmas back when I was a newlywed and my brother-in-law gave me Martha Stewart's Christmas. They are the one cookie about which John asks every year, "Hey, are you going to make those cookies with the pepper in them again?" To which I always reply, "Yes dear, again."

Ingredients

* 1 1/2 cups all-purpose flour
* 3/4 cup unsweetened Dutch-process cocoa powder
* 1/4 teaspoon coarse salt
* 1/4 teaspoon finely ground pepper, plus more for sprinkling
* 1 tablespoon plus 1 teaspoon good-quality instant espresso powder
* 1/2 teaspoon ground cinnamon
* 3/4 cup (1 1/2 sticks) unsalted butter , softened
* 1 cup granulated sugar
* 1 large egg
* 1 1/2 teaspoons pure vanilla extract
* Coarse sanding sugar, for rolling

Directions

1. Sift together flour, cocoa powder, salt, pepper, espresso powder, and cinnamon into a large bowl; set aside.
2. Put butter and granulated sugar in the bowl of an electric mixer fitted with the paddle attachment; mix on medium speed until pale and fluffy, about 3 minutes. Mix in egg and vanilla. Reduce speed to low. Add flour mixture; mix until just combined.
3. Turn out dough onto a piece of parchment paper, and roll into a 2-inch-diameter log. Roll log in the parchment. Refrigerate at least 1 hour or overnight.
4. Preheat oven to 350 degrees. Remove log from parchment paper. Let soften slightly at room temperature, about 5 minutes. Roll log in sanding sugar, gently pressing down to adhere sugar to dough. Transfer log to a cutting board, and slice into 1/4-inch-thick rounds. Place rounds on baking sheets lined with parchment paper, spacing 1 inch apart. Sprinkle each round with freshly ground pepper.
5. Bake cookies until there is slight resistance when you lightly touch centers, about 10 minutes. Transfer cookies to wire racks to cool completely. Cookies can be stored in airtight containers at room temperature up to 2 days.


Christmas Bread

From

FAMILY ADVENT CUSTOMS

by Helen McLoughlin

THE LITURGICAL PRESS St. John's Abbey, Collegeville, Minnesota

CHRISTMAS COOKING

Christ, the Bread of Angels, has been honored by special
"Christmas Bread" in every European country. Most delicious of
these are "Brioche" or French Christmas bread, the German
"Christstollen" whose criss-cross shape reminds us of the Child
in swaddling clothes, and "Melachrino" or Greek spice cake. The
latter our children call Hidden Jesus Bread, because of the
Infant baked in it. Recipes for all three are from Mrs. Berger's
"Cooking for Christ." Her family like ours is large. One half of
her recipe is usually sufficient for a small family. Margarine
may be used in place of butter.

"Brioche," a very light rich bread, is best mixed on Christmas
Eve so the dough can stand before it is baked. Use a very hot
oven on Christmas morning to make the dough rise quickly. The
crust is crisp and brown, the center soft when the dough is
handled lightly.

1 yeast cake 1 tblsp. sugar
1/4 cup warm water 6 slightly beaten eggs
4 cups flour 1 cup butter
1 tsp. salt 1/2 cup milk

Mix yeast with warm water and one cup flour. Cover and set aside
to rise. Mix remaining dry ingredients. Work in butter with your
fingers. Add eggs. Add milk very slowly. (The dough should be
softer than bread dough.) Mix in yeast combination and let rise
one to two hours. Punch down and keep in a cold place until ready
to use. Then shape in loaves. Place in two 6x10 loaf pans. Put in
warm place until dough rises about one third more in size. Brush
with beaten egg. Bake in hot oven (450 degrees) until brown. This
recipe will make two loaves.

Early Christians brought their bread to the altar at the
offertory procession. Some of it was used for the Sacrifice; the
rest received a special blessing after the consecration, but was
not changed into the Body of Christ. It was taken home as Blessed
Bread. Whenever we attend the Byzantine Liturgy at Fordham's
Russian Center, we take part in a similar custom.

The mother of the family may use her powers as a member of "the
royal priesthood" to which St. Peter refers in his First Epistle.
She may sprinkle holy water over the newly-made bread, and pray
Holy Mother Church's official blessing:

Mother: Let us pray. Lord Jesus Christ, Thou the bread of angels,
Thou the living bread of eternal life, graciously deign to bless
this bread as Thou didst bless the five loaves in the desert that
all who partake of it may have health of body and soul. Who
livest and reignest for ever and ever. Amen.

Eating blessed bread makes such an impression upon children that
no scrap of it is ever wasted "because it is God's special food."

Christstollen needs plenty of room so that the shape of the Child
in swaddling clothes will be surely seen in the folds of dough.

1 cake yeast 1 cup shortening
1 tblsp. sugar 1-1/4 cups sugar
1/4 cup lukewarm water 2 eggs
6 cups flour 1 cup raisins
1 tsp. salt 1 cup currants
1/2 tsp. nutmeg 1/2 cup blanched almonds
2 cups scalded milk 1/2 cup chopped citron
1-1/2 tsp. lemon extract

Dissolve yeast and tblsp. of sugar in warm water. Cover and allow
to rise. Cream shortening and sugar. Add eggs and scalded milk
cooled to lukewarm. Alternate with flour sifted with salt and
nutmeg. Add yeast mixture. Knead until smooth. Add fruits and
flavoring. Cover and let dough rise to double its bulk. Knead
dough again. Shape dough into ropes about one and one half inches
in diameter. For each large stollen make one rope three feet long
and two that are two and a half feet long. Braid the dough. Bring
the braid to a point at either end. Place the braid on a greased
cookie sheet. Bake in a hot oven (400 degrees) for 25 minutes or
until brown. This recipe will make two large Stollen.

After we have received the Eucharistic Bread at Christmas Mass,
we like a favorite sweet bread or spice cake which Mrs. Berger
calls "Melachrino." In Greece it is customary to hide a silver
coin deep in its crust; we bake a tiny figure of the Holy Infant
in the dough.

3/4 cup butter 1/4 tsp. mace
1-2/3 cups sugar 1-1/4 tsp. cinnamon
3 eggs 1/4 tsp. ground cloves
3/4 cup milk 1-1/2 tsp. baking soda
1-3/4 cups flour 1/3 tsp. salt
1-1/2 tblsp. lemon juice

Cream butter and sugar. Beat in eggs. Add milk alternately with
sifted dry ingredients. Stir in lemon juice. Pour batter into a
greased 9x14 loaf pan. Bake in a moderate oven (350 degrees) for
45 minutes. While the cake is still hot, ice with:

2 cups confectioner's sugar
5 or 6 tblsp. water
1/2 tblsp. lemon juice

From the Italians comes a quick dessert for that busiest of days,
"Vigilia di Natale," the Vigil of Christmas. It is a "Cassata" or
Cream Tart which may be made with store sponge cake to save time.

10 inch sponge cake 1-1/2 cups sugar
1-1/2 cups cottage cheese 2 tsp. almond extract
2 chopped squares of bitter
chocolate

Cut cake into three layers. Beat cottage cheese, sugar, almond
extract and chocolate together. Spread this filling between
layers. Chill cake in refrigerator. When cake is set, ice with

1 egg white 1 tsp. almond extract
1-1/2 cups confectioner's 1/2 tsp. lemon juice
sugar Candied fruits

We go to great lengths in Christmas cooking, but there are two
shortcuts which we take. One is the use of store cake in the
Cassata above and the other the use of prepared mincemeat, and,
on occasion, prepared pie crust.

Mincemeat pie at Christmas was originally made in an oblong
baking pan to remind us of Christ's birth in a manger, while the
richness of its ingredients and the spices remind us of the gifts
of the Magi. We use a standard prepared mincemeat and a standard
pastry recipe for a two crust pie. A 7x11 cake pan utilizes the
dough and leaves enough scraps after the pie is trimmed for a
pastry Infant Jesus. This is cut from a Nativity cookie cutter,
baked separately and placed on the manger-pie. The gingerbread
boy had Baby Jesus for his original model.

As Christmas approaches, the house smells of baking; presents are
wrapped; and the wreaths are hung. The children unveil the
Christ-Candle and set up their cribs. It is then that their Daddy
covers the fireplace mantle with evergreens--Oregon holly when we
can afford it--and centers a Madonna and Child with many vigil
lights as the focus of the room. A spray of evergreen is placed
across the top of every picture in the room; and a piece is wound
around a huge white candle placed on the dinner table to
symbolize the Light of the world for whom we have made these
elaborate preparations. As is the Irish custom, the candle is
lighted by the man of the house after the Angelus on Christmas
eve.


Sunday, December 13, 2009

Santa Lucia's Day Cinnamon Buns

This is a Cook's Illustrated recipe Rachel tracked down. We liked it because it was quick to prepare in the morning, having mixed up all the dry ingredients the night before. We didn't have any buttermilk, so she used John's Kefir instead.

Makes 8 buns. Published May 1, 2002.

Melted butter is used in both the filling and the dough and to grease the pan; it’s easiest to melt the total amount (8 tablespoons) at once and measure it out as you need it. The finished buns are best eaten warm, but they hold reasonably well for up to 2 hours.

Ingredients
1 tablespoon unsalted butter , melted, for pan Cinnamon-Sugar Filling
3/4 cup dark brown sugar (packed, 5 1/4 ounces)
1/4 cup granulated sugar (1 3/4 ounces)
2 teaspoons ground cinnamon
1/8 teaspoon ground cloves
1/8 teaspoon table salt
1 tablespoon unsalted butter , melted Biscuit Dough
2 1/2 cups unbleached all-purpose flour (12 1/2 ounces), plus additional flour for work surface
2 tablespoons granulated sugar
1 1/4 teaspoons baking powder
1/2 teaspoon baking soda
1/2 teaspoon table salt
1 1/4 cups buttermilk
6 tablespoons unsalted butter , melted

Icing
2 tablespoons cream cheese , softened
2 tablespoons buttermilk
1 cup confectioners' sugar (4 ounces)

Instructions


1. Adjust oven rack to upper-middle position and heat oven to 425 degrees. Pour 1 tablespoon melted butter in 9-inch nonstick cake pan; brush to coat pan. Spray wire rack with nonstick cooking spray; set aside.

2. To make cinnamon-sugar filling: Combine sugars, spices, and salt in small bowl. Add 1 tablespoon melted butter and stir with fork or fingers until mixture resembles wet sand; set filling mixture aside.

3. To make biscuit dough: Whisk flour, sugar, baking powder, baking soda, and salt in large bowl. Whisk buttermilk and 2 tablespoons melted butter in measuring cup or small bowl. Add liquid to dry ingredients and stir with wooden spoon until liquid is absorbed (dough will look very shaggy), about 30 seconds. Transfer dough to lightly floured work surface and knead until just smooth and no longer shaggy.

4. Pat dough with hands into 12 by 9-inch rectangle. Following illustrations below, fill, roll, cut, and arrange buns in buttered cake pan. Brush with 2 tablespoons remaining melted butter. Bake until edges are golden brown, 23 to 25 minutes. Use offset metal spatula to loosen buns from pan; without separating, slide buns out of pan onto greased cooling rack. Cool about 5 minutes before icing.

5. To make icing and finish buns: While buns are cooling, line rimmed baking sheet with parchment paper (for easy cleanup); set rack with buns over baking sheet. Whisk cream cheese and buttermilk in large nonreactive bowl until thick and smooth (mixture will look like cottage cheese at first). Sift confectioners’ sugar over; whisk until smooth glaze forms, about 30 seconds. Spoon glaze evenly over buns; serve immediately.

Sunday, December 6, 2009

St. Nicholas Speculatius and Spiced Wine

From

FAMILY ADVENT CUSTOMS

by Helen McLoughlin

THE LITURGICAL PRESS St. John's Abbey, Collegeville, Minnesota


ST. NICHOLAS DAY

St. Nicholas' feast day, December 6, is one of the highlights of
the Advent season. It is on this eve that our children hang their
stockings. From babyhood they learn to love the kind bishop with
his mitre, staff and bag of gifts--whose name has become parodied
as "Santa Claus" and whose memory is tarnished by commercialism.
In addition to the toys received on this feast, the Christ-Child
and His angels bring other gifts on Christmas Eve; and the Magi a
few more on Epiphany.

Placing less exclusive emphasis on December 25 as the day of
presents and also curtailing its gifts somewhat makes it easier
to place more emphasis on the religious aspects of that great
holy day. Do other children think ours are queer? Not at all. If
anything, they are a bit envious of children who receive Yule
gifts so early and who enjoy such a happy feast as our
traditional St. Nicholas Day party. Having an early gift day also
makes it possible for the children to give some of these gifts as
Christmas presents to other less fortunate children.

Treats of the St. Nicholas party are the exchange of gifts,
genuine Dutch cookies and Bishopwyn (bishop's wine). For children
the wine is grape juice. But the grownups who face the high
December winds along the Hudson River to pick up their children
at our house always welcome the mulled Bishopwyn. Its recipe is
from our favorite cook book, "Cooking for Christ" by Florence
Berger.

1 bottle of Claret 6 cloves 4 inches stick cinnamon

Break cinnamon into small pieces. Simmer wine and spices for
about five minutes. Strain wine. Serve hot.

The Speculatius, a spice cookie from the Netherlands, like all of
Mrs. Berger's recipes, is foolproof.

1 cup butter 4 tsp. cinnamon
1 cup lard 1/2 tsp. nutmeg
2 cups brown sugar 1/2 tsp. cloves
1/2 cup sour cream 4-1/2 cups sifted flour
1/2 tsp. soda 1/2 cup chopped nuts

Cream the butter, lard and sugar. Add sour cream alternately with
sifted dry ingredients. Stir in the nuts. Knead the dough into
rolls. Wrap the rolls in wax paper and chill them in the
refrigerator overnight. Roll the dough very thin and cut into
shapes. Bake in moderate oven (375 degrees) for 10 to 15
minutes.

The dough may be cut into St. Nicholas shapes, or into the shape
of birds, fish or animals. We also like to cut out stocking
shapes and ice them in honor of St. Nicholas, patron of school
boys.

During the party we light the Advent wreath candle, and the
children sing Advent hymns. All classes at Corpus Christi School
have wreaths, but some of the children do not have them at home.
We have found that parents, enjoying their Bishopwyn, have become
interested in the wreath and have integrated the Advent program
of school and home as a result of the St. Nicholas Day party.


Tuesday, July 28, 2009

Stovetop Macaroni and Cheese a la Schamelot

(Like Famous Dave's, only better!)

I modified this recipe from a Cook's Illustrated version after tasting Famous Dave's mac-n-cheese. If you keep shredded cheese in the freezer, it's practically as easy as boxed mac-n-cheese, but probably cheaper and definitely tastier--probably healthier, too!

Ingredients:

2 large eggs
1 (12-ounce) can evaporated milk
2 chopped jalapenos, seeds removed)
2 teaspoons table salt
1/4 teaspoon ground black pepper
1 teaspoon dry mustard , dissolved in 1 teaspoon water
1/2 pound elbow macaroni
4 tablespoons unsalted butter
6 ounces or 1 1/2 cups of extra sharp cheddar
6 ounces or 1 1/2 cups of Monterey Jack or Mozzarella

Instructions:

  • Mix eggs, 1 cup of the evaporated milk, pepper sauce (or 2 chopped jalapenos, seeds removed), 1/2 teaspoon of the salt, pepper, and mustard mixture in small bowl; set aside.
  • Meanwhile, heat 2 quarts water to boil in large heavy-bottomed saucepan or Dutch oven. Add 1 1/2 teaspoons of the salt and macaroni; cook until almost tender, but still a little firm to the bite.
  • Drain and return to pan over low heat. Add butter; toss to melt.
  • Pour egg mixture over buttered noodles along with three-quarters of the cheese; stir until thoroughly combined and cheese starts to melt. Gradually add remaining milk and cheese, stirring constantly, until mixture is hot and creamy, about 5 minutes. Serve immediately.
  • Ultimate Schamelot Stromboli

    (Picture coming!)

    We don't even make pizza anymore. It just doesn't compete with the stromboli!

    Ingredients:

    Dough:

    2 1/4 teaspoons active dry yeast
    1/2 teaspoon brown sugar
    1 1/2 cups warm water (110 degrees F/45 degrees C)
    1 teaspoon salt
    1/4 cup olive oil
    3 1/3 cups all-purpose flour

    Sauce:

    1 can tomato paste
    1 1/2 cans water
    1 teaspoon garlic salt
    1 teaspoon oregano
    1 teaspoon basil

    Fillings:

    1 lb. shredded mozzarella cheese

    any combination of the following:

    pepperoni
    sausage
    bacon
    mushrooms
    onion
    olives
    roasted eggplant
    ham
    pineapple
    anchovies
    peppers

    Directions:

    1. In a large bowl, dissolve the yeast and brown sugar in the water, and let sit for 10 minutes.

    2. Stir the salt and oil into the yeast solution. Mix in 2 1/2 cups of the flour.

    3. Turn dough out onto a clean, well floured surface, and knead in more flour until the dough is no longer sticky. Place the dough into a well oiled bowl, and cover with a cloth. Let the dough rise until double; this should take about 1 hour. Punch down the dough, and form a tight ball. Allow the dough to relax for a minute before rolling out.

    4. Preheat oven to 425 degrees F (220 degrees C).

    5. Divine dough in half and roll out into a rectangle. Working in the middle third of rectangle, spread sauce, cheese and meat/veggie combination. Fold one side-third over and then the other, sealing edges, and transfer to cornmeal-dusted stone or oiled pan. You can drizzle oil and salt over the rolls, or sprinkle more shredded cheese if you want to.

    6. Bake stromboli in preheated oven, until the crust is golden brown, about 15 to 20 minutes.

    Buon Appetito!

    Thursday, February 14, 2008

    Tomato Feta Sandwiches ala Angela

    Today is Angela Beckham's birthday (God rest her soul). She and I came up with the recipe for this sandwich about 8 years ago and I eat it at least a couple times a year, but always on her birthday! I've had more requests for this recipe than any other!

    1 fat loaf of Italian bread, sliced open hoagie style
    2 fat, juicy tomatoes (good luck in February!)
    1 cup crumbled feta cheese
    1 cup extra heavy mayonaise
    1/4 cup minced or chopped dried onion (fresh works, too, but I actually prefer the dried in this recipe)
    1 teaspoon oregano
    salt and pepper to taste

    Mix the mayo with the onion and spices. Slather it all over the cut sides of the bread and broil cut sides up on HI until golden and bubbly--it only takes a minute or two so watch it. Angela and I burned two loaves of bread one afternoon before we finally got the third one right (we still ate the other two anyway!)

    When the bread is toasted pile thick slices of tomato and chunks of cool feta cheese on top. Fold over, slice and devour!

    This may be the most delicious sandwich you'll ever eat!

    May the Divine Assistance remain always with us and may Angela's soul and the souls of all the faithful departed, through the mercy of God, rest in peace. Amen.

    Buon Apetito!

    Saturday, February 9, 2008

    Miracle Dough

    ...to play with, not to eat!

    This is the recipe for a WONDERFUL salt dough that is so lovely to work with and much more affordable than the store bought sculpt and bake products. Justin is totally loving it! I prefer to weigh the flour and salt so I've included the weights in ounces.

    5 cups or 21.25 oz. cake flour (I used Softasilk.)
    3 cups or 12.75 oz. all purpose flour
    3 cups or 31.5 oz. fine salt (I ran table salt through the food processor to powder it.)
    3 cups warm water 2 tablespoons cooking oil (Next time I'd like to try adding a drop or two of lavender oil--to reduce the likelihood of a clay fight in the kitchen!)

    Mix the flours and salt together in the Kitchenaid, then mix in the water and oil together. Knead the dough for 5-10 minutes, until the dough is smooth and pliable. Roll out a log of dough and hold it over the counter between your two fingers. If it stretches, it's too soft and you should add another tablespoon or two of all purpose flour. It if keeps its shape it's just right!

    Be sure to use two grades of flour so you get a dough that's dense enough to keep its shape, but not so heavy that it's hard to work with and likely to crack when you bake it. Also, don't skip the oil! Let the dough rest for 1-2 hours before working with it. Put it in sealable plastic bags in a cool place (the fridge is TOO cold). Keep the portion you're not modeling with wrapped so it doesn't dry out.

    Large figures should be baked for 3-4 hours at 300*F and small figures for about 2 hours at 225*F.

    (Pictures to come!)

    Happy Modeling!

    Tuesday, January 29, 2008

    Jessie's Homemade Ranch Dressing

    This is from my dear friend, Jess, who always brings us Spicy Beef and Bean Pie when I have a baby--the kids have been knows to ask me to have another baby so we could eat Beef and Bean Pie! This is the delicious salad dressing she brought the last time. Maybe I'll post the pie recipe later...

    1 cup mayo
    1 cup buttermilk, 3/4 cup for thicker dressing
    1 tbsp minced dried onion
    1/2 tea oregano
    1/4 tea onion pwdr
    1 tea dried parsley
    1/4 garlic pwdr or 1/2 - 1 clove garlic minced
    1/4 tea paprika
    1/8 cayenne pepper
    1/4 tea salt
    1/4 tea black pepper

    For dip use sour cream or yogurt in place of milk

    Buon Apetito!

    Monday, January 28, 2008

    Winter Soups--The Ultimate Comfort Food!

    I love soups in the winter time! They're great for a large, busy family. They're great for using up left-overs. They're great on a budget. They're just plain great! In the winter time, when the woodstove's going full blast I can put together a soup in my 24 quart stock pot, set it on the woodstove, and pretty much forget about it until dinner time!

    I have a lot of soup recipes, but here are a few to get started. I'll continue posting them until they're all here. Just keep checking "soup" in the archives.

    Buon Apetito!